Welcome to my blog.

Thanks for dropping by. I can see from my visitors log that I have lots of lovely visitors.
Please leave a comment so I know you called by!!xx


Saturday 31 December 2011

Happy New Year

I would like to wish all my blog readers a very

HAPPY NEW YEAR

and all the very best for 2012.

2011 was a very exciting year for me as I became a Stampin' Up! Demonstrator on 11/1/11 & what a year it's been. I now have a lovely customer base and a large group who come to my monthly classes. I also have a team of 4 demonstrators who are not only my downline but also lovely friends. It has been an absolute pleasure watching my class ladies develop their crafting skills especially those who had never picked up a stamp or ink pad before!!

I am looking forward to my business growing in 2012 and adding more classes & events so watch this space.

Thankyou again for taking the time to visit my little crafting space & I look forward to your visits in 2012.

Friday 23 December 2011

Another Easel Calendar


Here is another version of yesterdays calendar. This time I've used the Stampin' Write markers & shadow stamped the image which gives a lovely subtle effect.

Stampin' Up! products used

Stamps - Love & Sympathy, Parlour Prints & the sentiment is from a retired set.
Papers - retired
Ribbon - Very Vanilla Satin
Ink - Pear Pizzaz & Poppy Parade Stampin' Write Markers, Old Olive & Basic Black Ink Pad
Other - Top Note Die

Thursday 22 December 2011

Easel Calendars

Here is one of the projects we did at my last card class of 2011. Everyone really enjoyed making these calendars & some went on to make them as gifts for friends, colleagues & teachers! This one is from a batch I made to take in to work so I have used some retired products on these but the class ones used the gorgeous Timeless Portrait Designer papers.
I made a batch of these to take in to work & they also went down very well.

I'll be back tomorrow with another version of these calendars.

Stampin' Up! Products used

Stamps - Forever Young, Parlour Prints & Just Believe
Cardstock - Island Indigo
Ribbon - Retired
Ink - Basic Black
Papers - Retired
Other - Linen Thread & Top Note Die

Wednesday 21 December 2011

Table Decorations

My lovely SU Mum Jules gave us all one of these cute little decorations at our last Julies Jems team training. We all make projects to swap with the rest of the team & it's great for future inspiration.

I made a batch of 15 of these & took them in to work last week. Talk about gone in 60 seconds!! the first 3 people bought all but one which I had to keep as a sample & took orders for more which have been delivered today.
Now all I need to do is make the ones for our Christmas dinner table.

Thanks Jules for all your inspiration in 2011 & here's to a prosperous Stampin' Up! 2012!!

Tuesday 20 December 2011

Altered Heart

Firstly I need to apologise for my lack of blogging since the beginning of November. Things have been very busy in the Glynn Household & with one thing & another my blog had to take a back seat. I certainly haven't been idle & have been busy fulfilling lots of commission orders & Christmas orders & will be glad when Friday arrives & they've all been passed to their new owners!!

Right, on to today's project.

One of my closest cousins is my eldest daughters Godmother & I always struggle with what to buy her for Christmas so when I saw this gorgeous heart my 'SU sister' Nicky had made for our 'SU Mum' Jules I just had to have a go for my cousin. Sue really appreciates all things handmade & has kept all the cards I've sent her over the years so I know she will love this.

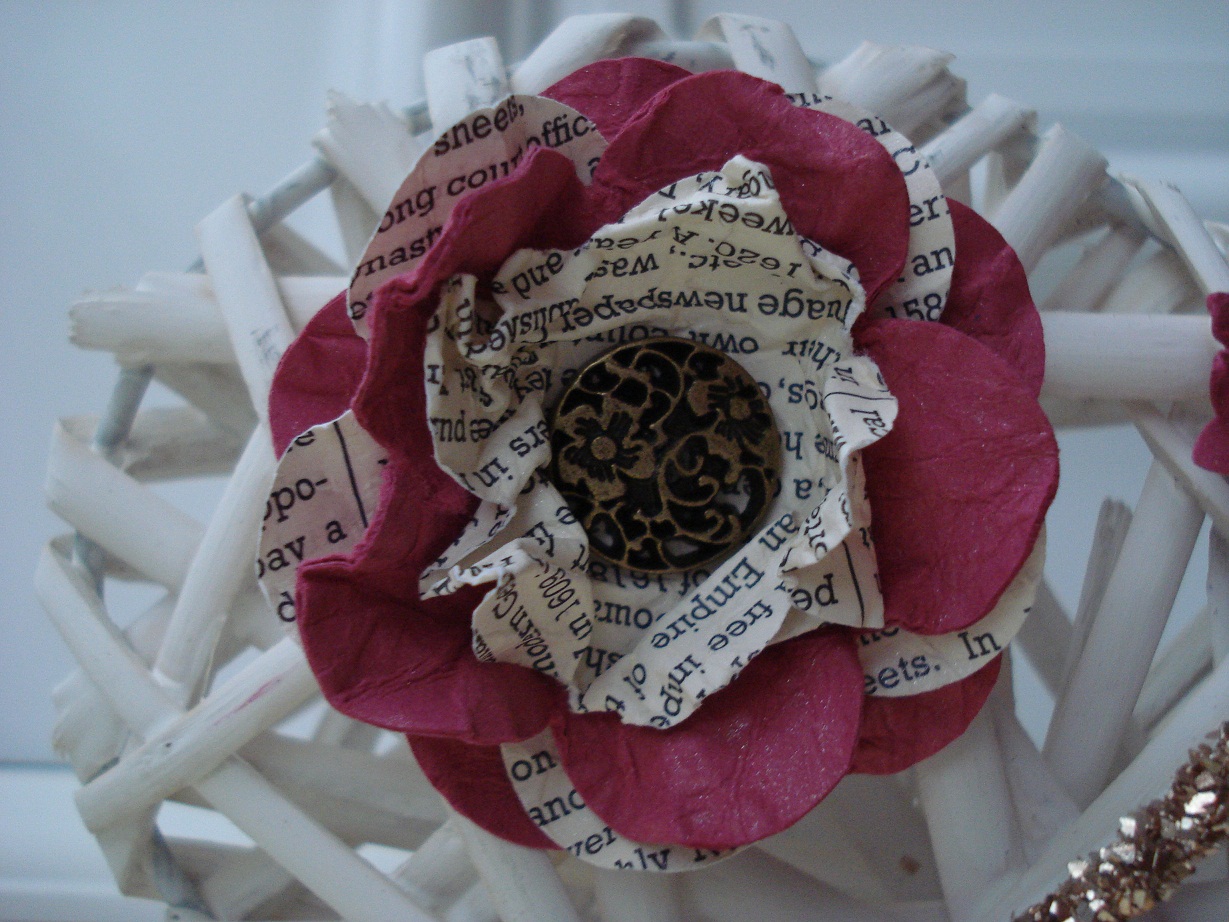
I spent an evening last week making these beautiful flowers using the Fancy Flower punch, Rose Red cardstock & First Edition Speciality papers finished off with the gorgeous Antique Brads, very therapeutic.

I've also added a little butterfly made with the Beautiful Wings Embosslits Folder & added some basic Pearls.
SUE has been die cut using the Timeless Type Junior Alphabet. I've cut eight of each letter & layered them to give a chipboard effect & then covered them with Crystal Effects.

A touch of Chantilly Lace in a double bow again finished with an Antique Brad and some Champagne Glass Stampin Glitter, very sparkly!!

The whole thing has been covered with Glimmer Mist made using the Frost White Shimmer Paint which hasn't shown up in the pictures but is beautiful in real life.

If you're still with me lol!! here is the heart before my makeover!

Thursday 3 November 2011

Less Is More - Stars

I'm very late entering this weeks challenge at Less Is More but better late than never!

I've used all retired Stampin' Up! products on this card but it gave me the effect I wanted.

I'd tried punching out a star & using the leftover bit as a template to stamp through onto the white background but it didn't quite work & the stars weren't defined enough so I decided to use the actual punch stars to stamp on.
I've used the Strength & Hope stamp to stamp on the stars which gave me perfect Christmas wording & the sentiment is from another retired set.

Friday 28 October 2011

It's been a long time . . . . . . . . . .

. . . . . . . . . . . . . since I made one of these!!


When I first started crafting (about 7 years ago) I used to make lots of these but since I've started using all Stampin' Up! products I haven't made one. They are really easy to do apart from the shoes which is a bit fiddly.


A friend of mine really wanted one for a Christening she's going to at the weekend so I relented & agreed to make one.


I really enjoyed it but they are a bit time consuming so won't be mass producing them lol!!

Sunday 23 October 2011

Sail Away With Me

I know I'm not on my own in finding it difficult to make mens cards so was delighted to see two of the mens stamps from the Mini Catalogue making it in to the new Stampin' Up!Idea Book & Catalogue one of which is this one 'Sail Away'
I've done alot of distressing on this card & sponged around the edges of the Whisper White cardstock using Crumb Cake Ink.
I've also frayed the edge of the ribbon & used the fibres to thread through the button.

Another 4 cards for my Sail Sale box!!

Stamps - Sail Away, Oval All & Sincere Salutations
Paper - Neutrals (Early Espresso)
Cardstock - Whisper White & Night of Navy
Tools - Large Oval Punch & Scallop Oval Punch
Embellishments - Striped Grosgrain Ribbon Night of Navy (retired) & Subtles Designer Buttons (Marina Mist)

Saturday 22 October 2011

Less Is More - Polkadots

For details of my In Color Ribbon share please see here

This weeks challenge at Less Is More is POLKA DOTS!!

I've missed the last couple of challenges & was determined that I wouldn't miss another week so went straight to my craft room as soon as I read the challenge.

I've used the new Pennant Parade stamp set to create the Christmas Tree & folded it to give a 3D effect but it also folds flat for postage so would be perfect to mass produce. We made these trees at Jems Training on Saturday & also used the new First Edition papers so I'm hooked on these!!

I've stamped the pennant in Old Olive on Certainly Celery cardstock so the Polkadots show up clearly. Spot the obvious mistake!! yes the tree pot!! I stamped it directly onto the white cardstock but it was wonky!! but it was the last thing to go on the card so had to re stamp it on a separate piece of card.

Do you like the effect with the Striped Grosgrain ribbon?? I've frayed the edges. I like the effect & have used it again on the card I'll show you tomorrow.

Stamp - Perfect Pennant
Cardstock  - Certainly Celery 
Paper - First Edition 
Ink - Old Olive
Tools - Pennant Parade Punch, Jewelry Tag Punch
Embellishments - Striped Grosgrain Ribbon Rich Razzleberry (retired) & Basic Rhinestones

Thursday 20 October 2011

Triple Treat Flower

I think this is one of my favorite stamps from the new catalogue is the Triple Treat Flower & it's a bargain at £7.95.

I love the detail on this stamp & it looks lovely stamped in any colour. The best thing about this stamp is that it co ordinates with two of the Stampin' Up! punches!! how cool is that. Makes it soooo easy to mass produce & I made 6 of these in no time!!

The new Ruffled Ribbon is also a 'must have' & you can have a share of each of the new In Colors see here.

Unfortunately I couldn't add the new Antique Brads as I'd used them all on my cards from yesterday but I will be ordering more a.s.a.p!!

Stamp             Triple Treat Flower
Cardstock       Lucky Limeade, Island Indigo & Whisper White
Ink                  Lucky Limeade & Island Indigo
Punches          5 Petal Flower,Fancy Flower & Modern Label
Ribbon            Island Indigo & Lucky Limeade Ruffled Ribbon
Misc                Square Lattice Embossing Folder

Wednesday 19 October 2011

Pennant Parade Flower

This is one of the cards we made at Jems team training on Saturday. This isn't actually 'the' card as that is packed nicely in a baggy book ready for me to show at workshops but I liked the design so much I had to make 6 more for my sale box.

Jules gave our table palpitations when we saw TWO of the beautiful new Antique Brads on one card (the other was next to the sentiment) so the ones I made today only have one brad in the centre.

The flower petals have been made by stamping onto First Edition Speciality papers & then punched out using the fab new Petite Pennants Punch showing that this stamp set doesn't have to be used for just creating bunting!

Thanks for looking & for any comments you leave.

Stamps          Pennant Parade
Papers           First Edition
Cardstock      Elegant Eggplant & Wisteria Wonder        
Ink                 Elegant Eggplant
Punches         Petite Pennant, Scallop Oval, Large Oval & Boho Blossoms
Misc              Antique Brads & Elegant Eggplant Scallop Dots Ribbon

Monday 17 October 2011

Before & After

For details of my In Color Ribbon share please see here.

At team training on Saturday I was presented with the Clear Block Caddy by my lovely upline Jules for reaching Bronze 3 on the Stampin' Up! Career Ladder.

I have recenty converted to Clear Blockism & admit to being a bit addicted to them at the moment so the caddy is a great addition to my storage tools.
When I unpacked it on Saturday night my first thought was 'that needs jazzing up a bit!!' but wasn't quite sure how. Then in the shower yesterday morning I thought of the Decor Elements Stampin' Up! Logo I had received in my Starter Pack (I have some of my most inspirational moments in the shower lol!!) but didn't really know what to do with it.
Voila PERFECT! for the front of the caddy.

Saturday 15 October 2011

Did You Know . . . . . . .

. . . . . . . . that Stampin' Up! now do material?? AND that you can use it with your Big Shot!!

I have just spent a lovely day with my Stampin' Up! family & this time had an SU Daughter to take along with me. I have been lucky to sign up 4 Demonstrators in the last 2 weeks so now have my own team which is very exciting & takes my Stampin' Up! journey to the next level.

We made some gorgeous projects which I will share with you over the next few days but today I wanted to show you what can be done with the material.

We had a lesson from the lovely Gemma in how to make 'Suffolk Puffs' or 'Yoyos' as they are known in the US.

I made a brooch for my Stampin' Up! tool case & I'm really pleased with it as a first attempt.

The Big Shot cuts perfectly through all materials including chipboard so it cut through the material like a hot knife through butter!!

I've used Designer Fabric Flirtatious & you get 3 co-ordinated designs each piece measuring approx 68.6 x 45.7 cm. The material has been cut using the Fun Flowers Bigz L Die & a Suffolk Puff, Scallop Dots Ribbon
& a Stampn' Up button to finish off.

If you would like any of the Stampin' Up! products or a Stampin' Up catalogue please contact me at s.glynn2@ntlworld.com